Sunday, May 31, 2009

Multigrain Struan [#17]

Learning to bake bread is one of the most satisfying things I've ever done. Every loaf is a new creation, and yet the very process of bread-baking is nearly as ancient as civilization itself. I've gathered recipes from sources old and new, from dusty books and from digital files. I've crafted loaves entirely with my own hands, and I've taken advantage of mixers and food processors. And in every case, the magic of the yeast, the ingredients, and the oven combine to create something warm, fragrant and inviting. Maybe some day I'll be blase, but for now I still experience a thrill, as a miracle observed, when I see the dough double.

There's also the social aspect: I've baked alone, I've had family members and friends stand beside me in my kitchen, and I've had virtual friends baking the same recipe at the same time and comparing notes on our computers via Twitter! And when the bread is baked? I love the smile when people bite into a fresh slice of bread, and I love posting pictures of my breads and viewing those of other bakers. There's a special connectedness in seeing that bakers all around the globe are baking around the same theme each month. Such is the special charm of Bread Baking Day - a monthly online event where bakers are invited to bake and share their bread.

The theme for this month's Bread Baking Day #20, hosted by Rachel of Tangerine's Kitchen, is "Multigrain Breads". While I've cooked many loaves in recent weeks that have more than one grain, the bread I really wanted to share this month is Peter Reinhart's Multigrain Struan, from his book, Whole Grain Breads: New Techniques, Extraordinary Flavor.

Reinhart has included a version of his struan bread in most of his bread books. The theory of the struan bread is that it is composed of what happens to be on hand, or in the current harvest. I feel quite blessed that my pantry is well-stocked, and I had all manner of delicious grains to choose for this bread. The version of struan in the Whole Grain Breads book is completely whole grain, and Reinhart's directions are quite detailed and thorough. Although you can find the recipe online, I'd advise getting the book if you are at all interested in baking with whole grains. The amount of information dispensed in the book is nothing short of astonishing.


n.o.e.'s notes:

- Reinhart advises that the bread is particularly good if a mixture of cooked and uncooked grains are in the dough, and he gives advice on cooking times and methods for the various grains.

- For my 6 oz of grain, I used:
1 oz steel cut oats (cooked 4 parts water to 1 part grain, as oatmeal)
1 oz barley (cooked 2.5 to 1)
1 oz quinoa (cooked 1 to 1)
3 oz Bob's 10 grain cereal (uncooked)

- I froze the extra barley and quinoa in 1 oz packets for future use.

- All of the flour in the bread is whole wheat flour. I used half white whole wheat and half regular whole wheat (both King Arthur) for the biga, starter, and final dough.

- My sweetener was agave nectar.

- In the proofing stage, the bread rose 1.5 inches above rim of 8.5 x 4.5 pan

- I did not use the steam option for baking. My bread was done after 50 minutes in the oven.

- We waited just over an hour before cutting.

the verdict:

When the bread was still slightly warm, we sliced into it and sampled it plain.
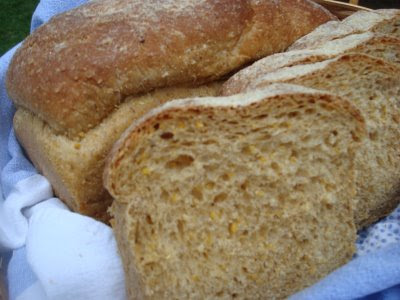
this was GOOD. We enjoyed the very subtle and complex flavors. The texture was moist and the taste just a touch sweet. The bread was versatile, too, and was delicious toasted with butter.

Note: I'm sending this bread to Yeastspotting, a weekly compendium of all things yeasty. Congratulations to Susan on her 1 year Yeastspotting anniversary!

Friday, May 29, 2009

Italian knot rolls

The oh-so-fabulous Bread Baking Babes baked Italian Knot Rolls as their May recipe. This month's host babe, Ilva from Lucullian Delights has the recipe on her May 20 post, along with some helpful pictures of how to form the knots into rolls (or is it: form the rolls into knots?) The Italian name for these rolls is pane di pasta tenera condita, and the recipe is from a book by Anna Gennari. I decided to bake the rolls as a Buddy of the Babes this month.

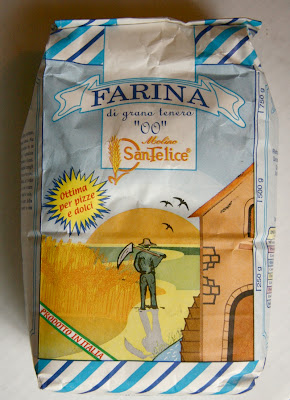
You can't get much more white-flour-soft than this recipe; it calls for white bread flour as well as Italian "00" flour, which is similar to white cake flour in North America. The most unusual/controversial ingredient in the recipe is lard. Ilva explained that the lard gives the rolls a special tenderness and flavor that it cannot get from any other fat. She also gives the reassuring information that the lard constitutes a mere 2.7% of the recipe. I've never cooked with lard; in fact I typically make a point of avoiding recipes with that ingredient. But I figured I might as well try it in the interest of accuracy.

n.o.e.'s notes:

- To make the recipe as written, I needed a couple of new ingredients in addition to the lard: fresh yeast and "00" flour. The recipe listed acceptable substitutions for each of them, however, so I knew I was covered if I couldn't find the ingredients. My first shopping stop was Star Provisions, a wonderful specialty market not too far from my house. I was in luck! I found both a block of fresh yeast and a bag of imported Italian "00" flour. Sadly, there was no lard to be found on the premises, so it wasn't one stop shopping.

- My next stop was the local grocery store. The only lard that I could locate was a 2.5 pound tub. The package size seemed a little excessive for the few grams that I'd need, but it cost less than $4, so I put it in my shopping cart and called it a day.

- With my ingredients in place, I felt ready to tackle the knotty recipe!

- My plan was to make 1/2 recipe; a dozen or so rolls would come in handy without being too many.

biga

- I was so curious and excited to use the fresh yeast in this recipe. It crumbled and dissolved easily with the bit of room temperature water.

- The directions say to leave the biga partly uncovered or cover with a towel. I chose the towel option and the contact with the air overnight made the biga form a dry crust on top. I hoped it would soften and incorporate when mixed with rest of dough ingreds

dough


- The lard worked into flour beautifully.

- I used a Trader Joe's Italian specialty olive oil, and a local black sage honey.

- The yeast dissolved beautifully and everything was going nicely until I poured in all the liquid and realized that I'd neglected to halve the water. Luckily I hadn't yet added the biga. So I quickly mixed up another half quantity of all the ingredients - except the water - and mixed it in with the dough.

- But I only had a half recipe of biga! I weighed out half of the dough mixture and added the biga to it. At this point I was in "thrash mode" so I forgot I was supposed to add 250g of the biga. I just stirred it all in without measuring it.

- I added flour and water to other half of the dough and put it in the fridge to retard.

- It turned out that the "skin" of the biga did not soften or mix in with the dough, but just broke up into smaller hard bits. You can see the lumps in the picture of the finished rolls, 3 pictures below.

- The fresh yeast was very fast; my dough doubled in less than an hour.

- I measured out 12 rolls at 100 g each. I'd never formed knots, so the diagram was very helpful. I found it easier to hold them in my hands rather than on the counter. As I went along I got better at pushing the ends up from underneath to make the knots pop up.

- The yeast continued to rise fast: the first roll was doubled by the time I shaped the 12th.

- The rolls were baked in short order: they reached an internal temperature of 200 degrees after baking at 375 for 20 minutes.

the verdict:

The rolls made a bit hit with my husband, daughter J.D.E. and her friend G. My husband loved the complex subtlety of the flavors: "This might be the best stuff you've ever made." All in all, I'm glad that Ilva chose this tasty recipe and I'm very glad that I baked along with the Babes this month.

A footnote about the other half of the dough, which I made as a non-biga version:
I was much better at the shaping technique. The dough was smoother. I had just guessed at the flour and water amount, but they rose and baked nicely. And the taste? A bit "flatter" and "flourier" and maybe a little "tougher" too, but not half bad ! We enjoyed these for sandwiches and as buns for our hot dogs on Memorial Day.

Tuesday, May 26, 2009

BBA Slow & Steady #1: Anadama roundup

The bread-baking blogisphere has been all atwitter about the BBA Challenge, organized by Nicole of Pinch My Salt. There are 200 bakers on the Challenge's blogroll, and anyone else is welcome to join Nicole in baking each and every recipe in Peter Reinhart's book, The Bread Baker's Apprentice. The Challenge is loose as far as rules are concerned - if you are baking the book's recipes from beginning to end you are meeting the challenge's requirements. Nicole is baking weekly, as are most of the other bakers.

A couple of my baking acquaintances and I are taking up the Challenge, but at a slower pace. We will be baking and posting our bread every other week, and think of ourselves as the Slow & Steady sub-group. Not that we actually expect to win any races, or even enter any races, but we are enjoying baking the breads in our own good time. We may be a day late and a poolish short (esoteric bread term, there!), but we're having lots of fun comparing notes and supporting each other as we learn Peter Reinhart's yeast-y methods.

Here are the bread posts of the Slow & Steady BBA bakers for the first formula, the Anadama bread:

Jessica of Singleton in the Kitchen


And lastly,

If you baked this bread too, please feel free to add a link in the comments on this post. If you're baking on the same every-other-week pace, I'd be interested to hear that as well (most of the challenge group is baking weekly).

The next bread in the Bread Baker's Apprentice Challenge is another "A" bread: Artos, the traditional Greek celebration bread. The book details three variations, and we will each bake at least one shape/flavor. The Slow & Steady folk will post by Monday, June 1. Look for another little roundup a few days later.

Thursday, May 21, 2009

Rice Bread, Pullman-ish


I have two long slim loaf pans, vintage pans from the 1950's, which are my very favorite pan for baking 1-lb sized loaves of quick bread. My mother used this kind of pan for her cranberry bread, and her loaves always turned out perfectly. Several years ago my father came across some identical pans and mailed to me for my birthday. When I unwrapped them I began to cry because I thought that they were hers. Luckily, Mom hadn't quite given up baking yet! But now she has, and her pans are going to my sister-in-law, who's an amazing cook.

The straight sides of these pans are perfect for molded terrines, frozen or layered desserts, or even cakes. The slices are very square. You can get a sense of the proportions in the pictures of my Yogurt Cake.

As luck would have it, I also have a pair of similar vintage pans that are just over half the capacity of the long ones. If I had to grab something on the way out of a burning kitchen, it would be these 4 pans!


What's even cooler is that one of these pans has a slide-on cover. It can function as a Pullman pan, although it has some rounded edges and corners where a Pullman's are quite square. I've seen some beautiful-looking recipes for Pullman yeast loaves, but when I was paging through Dan Lepard's The Art of Handmade Bread; Contemporary European Recipes for the Home Baker and saw Rice Bread, which he cooked in a Pullman pan, I just knew that was the one I had to try in my covered pan. (Dan's book was published in Britain as The Handmade Loaf)

n.o.e.'s notes:

- The dimensions of most Pullman pans are larger than my pans, so I figured that I'd need to scale the recipe. I did my best to compare my pan size with the one Dan specifies and scaled the recipe accordingly.

- Things got a little tricky when I had to convert from fresh yeast to instant and then scale the amount.

- Dan's bread-making method is absolutely fascinating; it borders on a no-knead bread. First you mix entirely by hand - using your fingers. Than you knead it on an oiled surface ever so briefly: for 10 seconds every 10 minutes or so, letting the dough rest and develop in between. After a few rounds, the dough rises in its rising bowl or bucket.


- After the bulk rise and the proofing, I was left with a little ball of dough that was nowhere near big enough to fill that loaf pan. So I grabbed one of the shorter pans. I figured I'd bake the loaf uncovered (an option listed in the recipe) but then I noticed that the same sliding cover actually fit on the smaller pan.


- The theory of the Pullman is that the bread will try to rise as it bakes, but the lid will constrain it, forcing the dough into every corner of the pan and producing a dense, tight crumb.

- The cover is placed on the pan for the second rise (proofing). Once it was in place, it was hard for me to gauge how much the bread had risen in the pan and to guess how much more it might want to rise in the oven. Finally it seemed to be at a good baking point. I let it bake over half the time undisturbed, then was able to slide the top (you want to generously grease every part of a pullman pan) to test for doneness.


- Even though the pan was smaller and the lid kept the top flat, the loaf didn't rise to fill the entire pan, so it ended up with rounded top edges - which happened to match the bottom edges! The pictures don't really show it, but this was a diminutive loaf - so cute! Each slice was smaller than a deck of cards.

- I loved how the rice grains were still visible in the crust (see, in the picture above?)

- I was actually amazed that this bread turned out!


the verdict:

Soon after the bread cooled, I cut a piece off to taste (well, OK, I cut it to photograph, but then we had to taste it!) The first thing my husband said when he took a bite was, "this bread tastes European." Bingo! How did he know?

I eat white bread so seldom that I forget just how good a good white bread can be. Although truth be told, I don't think I've ever had white bread that tastes this good! The rice adds a chewy, dense and moist element to the texture, and the underlying flavor will differ depending on the type of honey used and even the oil that's used for the kneading.


As good as the bread was plain - and it was really good plain - it was even more wonderful toasted. It crisped up on the outside but remained dense, chewy and moist inside. It was about as substantial as a white bread could get. A big punch from a little loaf!

This loaf is heading over to Yeastspotting, and so should you!

Monday, May 18, 2009

Anadama Bread {bba}


Just in case I wasn't crazy enough already, I've taken on a new baking project - the Bread Baker's Apprentice Challenge. A blogger named Nicole of Pinch My Salt started the whole thing with a simple "tweet" on Twitter, asking if anybody wanted to join her in baking through Peter Reinhart's book, The Bread Baker's Apprentice. Well, the idea took off like wildfire, and by the time of the sign-up deadline, there were an even 200 bakers from around the world, all ready bake bread. Luckily for me, there aren't a lot of rules and regulations that come with the project; in fact the only rule is to bake each recipe in the book in order. Nicole (and most of the other bakers) will be baking weekly, but I knew that a weekly pace would be hard for me to maintain, given the other bread- and non-bread-baking that I need to fit into my schedule. So a couple of my bloggy buddies, Food From Books, The Tortefeasor, A Singleton in the Kitchen, Grandma's Kitchen Table, and I, are going to bake "together" and post every other week. At this leisurely rate we should make it through the book in somewhat under two years. And learn a whole lot about bread in the process!

The first interesting thing I learned is that the book is arranged alphabetically by name of bread. How cool is that? Very cool, but an arrangement by degree-of-difficulty might have been a bit more reassuring for a somewhat-novice baker. Luckily the uber-tricky sourdough recipes are all in their own group at the end, so by the time we get there I can abandon ship prepare myself.

First up in the challenge is the Anadama Bread, a classic New England bread, and a charming domestic tale underlying its name. You can read the lore and get the recipe here. The bread is made with molasses and cornmeal, so it's a bit sweet with a touch of crunch (or grit, depending on the coarseness of the cornmeal used)


n.o.e.'s notes:

- The recipe calls for coarse ground cornmeal. By some fluke I happen to have 4 different brands of cornmeal in the house, none "coarse grind". I couldn't see buying any more cornmeal just for this recipe (those thrifty New Englanders who made this bread recipe certainly wouldn't have), so I used 4.5 oz of the coarsest cornmeal I had and 1.5 oz quick grits for a little North/South fusion.

- The cornmeal is mixed with water and becomes a "soaker" which sits for awhile before being joined by flour, yeast, and more water and turning into a "sponge" after it in turn sits on the counter.

- When the soaker-now-sponge is joined by molasses, flour, salt and butter, it becomes dough. You can knead it by hand or with a mixer, but I used my food processor. In short order, the dough passed the "windowpane" test (could be stretched until translucent) and registered between 77 and 81 degrees on my instant read digital thermometer.

- For half of the flour I used white whole wheat.

- I had been tempted to make half a recipe but "all the other kids" were making a full recipe, so I did too. The recipe makes two 9x5 or three 8.5x4.5 loaves. I split my dough in half. With one half I made two small loaves (which I planned to give away) in my 7.5x3.5 pans. The other half of the dough produced one 8.5x4.5 loaf and two 4-oz rolls.

- I dusted the bottoms of my pans with cornmeal to help with releasing them later.

- The dough rose very quickly.

- My loaves got a few false starts in the oven. I pulled them out to take photos (really, sometimes I question my own judgment) and to mist them and dust them with cornmeal (which I'd totally forgotten).

- The loaves had no oven spring (hmm, do you think the in-and-out of the oven had anything to do with it?) and actually flattened out a bit. That's OK, the crumb was pretty nice, so I was happy.

how we ate it:

Well, I have to confess that we did, in fact, eat it all. My husband, Jim, is a big toast person, so the bread was great to add to his morning rotation. We also made two dinners out of Anadama sandwiches.


sandwiches:

The first night we had "Farm Box special" themed sandwiches--

1. duck egg salad w lots of salt and pepper + tomato + arugula (above)

2. roast chicken + tomato + arugula (from our garden!) + mustard (below)

The duck egg, tomatoes and roasting chicken were from the farm box! (and the potatoes for the potato salad)


sandwiches, round 2:

The second night, the sandwiches were "New England meets Sweden"--

smoked turkey, Vasterbotten cheese (from Sweden), sliced Granny Smith apple, lingonberry preserves (also Swedish) (below)

the verdict:

Well, given the fact that the two of us polished off this load of bread in less than a week, you can say this was a keeper recipe for us. Although it has molasses, we didn't find it particularly sweet. Nor did the molasses flavor stand out for us (although it did for some of the other bba bakers). This bread was fantastic for sandwiches, and was a great accompaniment to a variety of flavors. I was very sorry that I only made 2 buns. Jim liked it even better as toast, though! The toaster really brought out the crunch of the cornmeal.

Wednesday, May 13, 2009

Whole Wheat St. Lucy buns [#16]

Back in March I had a rare weekend with both girls at home. J.D.E. was here for her Spring Break and A.L.E. came just for the weekend. We did a good bit of bread baking, and I made each girl her own special batch of homebaked bread. For A.L.E. I chose Whole Wheat Santa Lucia Buns from Peter Reinhart's book Whole Grain Breads.

St. Lucy, an early Christian martyr, was blinded (and then killed) when she refused to renounce her faith. As a result she is the patron saint of the blind. She's especially venerated in Sweden, where on her December feast day young girls distribute sweet buns in Lucy's honor. In making the buns, raisins can be added, symbolizing the saint's eyes. A little graphic, maybe, but that's often the way with martyred saints.

A.L.E. has always had a soft spot for St. Lucy so I was excited to bake these buns for her, even though we were not in the correct season. Reinhart's whole wheat buns are not particularly sweet in taste, but they are lovely in appearance, which made them perfect for sharing with special daughters on their visit home. I packed up the leftovers for A.L.E. to bring back to her apartment.

Shameless imitation of photo in Reinhart's book This bun has the raisin "eyes" of St. Lucy
n.o.e.'s notes:

- The recipe, as I made it, is at the end of this post.

- For both the biga and the soaker, I used a little over half white whole wheat flour and the rest was regular whole wheat.

- For liquid, I used yogurt - the soaker was very crumbly and dry. At the time I didn't know what to add. I ended up misting it with water before I left it to rest on the counter. (Since I baked these I've been a good girl and have been reading the intro chapters of the book and I now know that I could have added some milk to get it to the proper consistency. Luckily it really didn't matter in the end.)

- After its 5 minutes of rest the biga dough was so wonderful to handle that I was sorry I only got to knead it for a minute. It was quite smooth and elastic.

- In making the final dough I used around half regular whole wheat and half white whole wheat. I kneaded by hand, adding some water to get to the proper consistency.

- The dough rose very nicely in the bulk rise, then I formed it into balls:

-After the balls rested for 10 minutes, I formed them into long snakes, then coiled them. Reinhart gives two ways to shape the coils (I'll call them "S" shape or "C" shape), so I did half one way and half the other way:


- After the buns proofed, I painted them carefully with an egg white wash (I didn't want them to deflate), then baked them on the same parchment on a baking sheet on top of baking stone.
Bold
- The buns were in the oven for 25 minutes and they were already over 200 degrees.

the verdict

These rolls were a big hit. Says A.L.E.: "They're fantastic and sustained me for a week. Great taste and look."

Besides the fact that I was inordinately proud of how pretty the rolls looked, they were absolutely delicious. We enjoyed them warmed or at room temperature, with butter and without. Sometimes whole wheat bread can have that assertive "not the best texture but it's good for you" quality. These rolls are very different; it's hard to believe they are entirely whole wheat - there's such a nice chewy elasticity in the texture. I'm sold on Reinhart's methods of maximizing the goodness of the grain through pre-ferments.

I'm submitting these rolls to Yeastspotting. Stop by and check out all of the yeasty goodness!


the recipe:

Santa Lucia Buns, as adapted

Soaker
227 g whole wheat flour (I used 127g KA white whole wheat and 100g KA whole wheat)
1/2 tsp salt
3/4 c plain yogurt

Mix all soaker ingredients together in bowl, until they form a ball. Add a bit of milk if necessary. Cover loosely with plastic wrap and leave at room temp for 12-24 hours.

Biga
227 g whole wheat flour (I used 127 g KA white whole wheat and 100 g KA whole wheat)
1/4 tsp instant yeast
142 g filtered or spring water at room temp
1 lg egg, slightly beaten (47 g without shell)

Mix biga ingredients together in bowl to form ball of dough. Knead in bowl for 2 minutes with wet hands; the dough will feel very tacky. Let dough rest for 5 minutes then knead again with wet hands for 1 minute; dough will be smoother but still tacky.

Transfer dough to clean bowl, cover tightly with plastic wrap and refrigerate for 8 hrs-3 days.

Remove biga from fridge about 2 hours before making final dough.

final dough
All soaker (401 g)
All biga (417 g)
113 g whole wheat flour (I used half KA white whole wheat and half KA whole wheat
5 g salt
7 g instant yeast
71 g honey
56 g light flavor olive oil
1 egg white w/1 T water and 1/4 tsp honey for egg wash

Cut soaker and biga into 12 pieces each with metal pastry scraper. Sprinkle with flour to keep pieces from sticking

Put all pieces in bowl with the 113 g flour, salt, yeast, honey, and oil. Knead with wet hands 2 minutes; until all ingredients are incorporated. Dough should be soft and slightly sticky. Add water or flour as necessary (I had to add some water).

Turn dough onto floured counter and roll in flour to coat. Knead dough by hand for 3-4 minutes, incorporating flour as needed to make soft and tacky but not sticky consistency. Form into ball and let rest for 5 minutes.

Meanwhile, prepare a clean, lightly oiled bowl.

Continue kneading for 1 minute to strengthen the gluten. Dough should be soft and supple and pass the windowpane test. Form into ball and place in bowl, turning to coat with oil. Cover loosely with plastic wrap and let rise at room temperature for 45-60 minutes, until it is 1 1/2 times its original size.

Line a sheet pan with parchment paper. Divide dough into 12 pieces. Round each piece into a tight ball then cover and let rise for 10 minutes. Roll out each ball into an even strand about 10" long. Spiral each strand from both ends toward the center, forming 2 snail shells that meet in the middle. You can flip one end so it is an "S" shape. (I flipped half). Place the shaped pieces of dough onto the parchment, leaving 1 1/2" between them. Mist the tops with oil and cover loosely with plastic wrap. Let rise at room temperature for an hour, until rolls have grown to 1 1/2 times original size.

Meanwhile preheat oven to 425 degrees. Brush the tops of each bun with egg white wash. Place raisin in center if desired and place pan in the oven. Immediately lower the temperature to 350 degrees and bake for 15 minutes. Rotate pan 180 degrees and continue baking for an additional 10 to 20 minutes, until browned and at least 195 degrees in the center. Cool on a rack for at least 30 minutes.

Friday, May 8, 2009

Multigrain Bread Extraordinaire [#12]


First of all, let me apologize for anyone who follows this blog in a reader, as last night I mistakenly published (for all of 5 seconds) a very rough draft of this post - sorry you had to wade through all my notes!

Back in March, pinkstripes posted some amazing rolls,made from Peter Reinhart's formula for Multigrain Bread Extraordinaire (adapted recipe, as I make it is at the end of this post). I had a huge queue of yeast bread recipes to try, but this one got to jump the line because of its promise to be "the best toast in the world." If anything, we are all about The Toast in this house.

The first time I made this bread, I cobbled the recipe together from the Google book preview (partial recipe online) and the posts of pinkstripes and various other food bloggers. While the loaf was rising I got on my computer and ordered a copy of the book for myself - I loved what I saw in the preview! (And now that I have the book I can say it is well worth the purchase)

This is the soaker after a day on the counter. See how the quinoa has unwound?

n.o.e.’s notes:

- The formula for this bread gives lots of options of various grains to use, and also gives a choice of liquid. It truly can be customized to your taste preferences. The first time I quinoa + oats + buttermilk. For subsequent loaves, I’ve settled on Bob's 10 grain cereal + oats + buttermilk

- The brown rice is important to this bread. I made half a recipe's worth of brown rice, separated it into 1 oz packets and put them in the freezer for future loaves.

- I use the food processor for mixing the dough. First pulse the dry ingredients to mix them. Initially I added the liquid too slowly, and the dough went past the internal temp range (mine was 84 degrees) and passed the windowpane test before I got all the liquid in. To keep it from getting overheated, I incorporated the rest of the honey by hand. I've now learned to add the liquid ingredients while they are cool to cold, and to pour them steadily. The food processor only needs a minute or so to mix the ingredients.

- The dough is very sticky, so I usually incorporate more flour to get it to a good workable consistency.


- This bread rises like a fiend.

- I don't brush anything on the crust. We're not big seeds-on-bread folks. Figured I'd just brush it with some butter when it was done.


- My only 9x5 loaf pan is pyrex. My first loaf stuck to the sides and bottom of the pan and I had to manhandle the loaf with a spatula to get it out. Luckily the bread is springy - it held together despite lots and lots of prying and it got back in shape fairly well. Now I routinely sprinkle cornmeal or rolled oats in the bottom of the pyrex pan before putting in the dough.

see the "forceps" mark where I had to pry the bread out of the pan?
the verdict:

The bread is surprisingly soft inside. Even though I'd read other bakers' reactions and knew it would be tender I was still startled by the light but not dry texture. This bread is so soft that the bread knife almost tears the bread rather than cutting it. It's nearly fluffy, and quite moist inside. And the taste - a little chewy, a little tender, a little sweet, with a nice complexity from the whole grains.
Although I enjoyed the first version of this bread, my husband found the quinoa to be quite a bitter taste. So I now use a multigrain cereal mixture and everyone is happy!

the toast test:

Is it even possible for toast to taste this good? I literally didn't want to finish my piece of toast; I just wanted to savor every last bit. Peter Reinhart was right: toasted until golden, and spread liberally with butter, this was the perfect toast experience.


Multigrain Bread Extraordinaire

Adapted from The Bread Baker’s Apprentice- this is the way that I make the loaves. See Reinhart's book for more complete instructions and the variety of choices for each ingredient
The formula is for one 2-lb loaf in a 9" x 5" pan.

Soaker:

  • 3 tablespoons (1 ounce) 10-grain cereal mix
  • 3 tablespoons (.75 ounce) rolled oats
  • 2 tablespoons (.25 ounces) wheat bran
  • 1/4 cup (2 ounces) water at room temperature

Combine the above ingredients in a small bowl. Cover with plastic wrap and leave at room temperature overnight to initiate enzyme action.

Dough

  • 3 cups (13.5 ounces) unbleached bread flour
  • 3 tablespoons (1.5 ounces) dark brown sugar
  • 1 1/2 teaspoons salt
  • 1 tablespoon instant yeast
  • 3 tablespoons (1 ounce) cooked brown rice, cool or cold
  • 1 1/2 tablespoons (1 ounce) honey
  • 1/2 cup (4 ounces) cool buttermilk
  • 3/4 cup (6 ounces) cool water

Pulse the flour, sugar, salt and yeast in bowl of food processor. Add the soaker and rice, and pulse until incorporated. With the food processor running, pour the honey, milk and water in a stream.

Process a minute or two, then knead by hand briefly to make a dough that is soft and pliable, tacky but not sticky, and until internal temperature reaches 77 F to 81 F on an instant read thermometer and can pass the window pane test. (This often happens while the dough is still in the food processor. I knead for a minute or two by hand to get a feel for the dough and to adjust the flour and water as necessary)

Lightly oil a bowl and transfer dough to the bowl, rolling it around to coat with oil. Cover with plastic wrap and leave at room temperature for about 90 minutes or until double in size.

Place dough into a lightly oiled bowl, spray top with oil, cover, and let rest for 90 minutes or until doubled.

Turn dough onto counter and press it to rectangle about 3/4 inch thick. Form into loaf by rolling the dough, then place into oiled 9x5 loaf pan. Mist with oil and cover dough loosely with plastic wrap or a clean towel.

Proof dough for another 90 minutes or so, until dough doubles and crests the pan about 1 inch in the center.

Preheat oven to 350F. Bake 20 minutes, rotating 180 degrees and then bake an additional 20-40 minutes until the bread temperature registers at least 190F in the center on instant read thermometer, and the loaf is golden brown and makes a hollow sound when tapped at the bottom.

Remove immediately from pan when done and cool on rack for at least an hour before eating. Enjoy, especially toasted!

Monday, May 4, 2009

Honey Wheat Ricotta Bread [#15]

My mother tells a story about her grandmother, one of three little girls. At one point all of them contracted smallpox and were very sick. They were all lying in the same bed when doctor came; he took one look at my great-grandmother, who was the sickest of the three, and said, "she is not going to make it. Roll her to the wall and we'll treat the other two." So they did, and as it turned out, my great-grandmother survived but her two sisters did not.

That's kind of how things went with this bread. Read on and you'll see.

There are dozens of bread recipes that I've bookmarked - physically and electronically - but I chose this recipe for Ricotta Bliss Bread, which I saw on Rose Levy Beranbaum's blog (it's also in her Bread Bible), because I had a container of ricotta in my fridge that was calling to be used.

n.o.e.'s notes:

- Beranbaum calls this formula "bliss" bread, presumably because it is so perfect, but of course I had to tinker with the recipe, adding some whole wheat and subbing honey for the sugar.

- This is a direct rise dough, so it can be mixed and baked on the same day.

- I baked it as loaf bread (although Beranbaum waxes rhapsodically about how great it tastes as a free form loaf.)

- The recipe calls for the whole milk ricotta; I used part skim.

- I replaced the sugar with 2 T honey, added with the wet ingredients.

- Just under half of the flour was white whole wheat.

- This was the first time I'd followed one of Beranbaum's recipes. The primary instructions for this bread called for the food processor. One of the ingredients is "cold water." Now, the water from our tap can hardly be called "cold" and our refrigerator's water dispenser was broken. So I threw a couple of ice cubes into some water and weighed it. Oops, short a few ounces, so tossed in more ice. Then on with the recipe.

- The dough was really really cold. I set the rising bucket in my warmest spot to rise. Usually my dough rises faster than the time estimates in the recipes that I follow.

- At the end of an hour I checked and saw that the dough had not risen. Not a bit. In fact it was still cold. During that hour, I'd finally done some reading in Beranbaum's book. There was a comment in the book that ice cold water would kill the yeast. Yipes. I became convinced that I'd slain my yeast with the ice water I used :(

- So I tossed that dough aside as a failure and mixed up another - smaller - batch of dough with the the remainder of the 15 oz ricotta container, scaling the other ingredients appropriately:
360 flour (160 white whole wheat, 200 all purpose)
3.5 g instant yeast
180 g ricotta
85 g cold water
7 g salt
40 g egg in shell (I used a 51 g egg and spooned a bit out)
heaping 1 T honey
- A while later I looked over at the first batch of dough and found out it had risen after all. So I baked it in the 9x5 pan and put the other pan in the fridge to bake later.

- As it turned out, the first loaf, the "failed" one, baked up beautifully. And the second loaf? Lackluster! It didn't rise well, nor did it taste all that great.

- I've made this bread several times since this first loaf, and each time the dough takes a fairly long time to begin rising, but never as long as that first time when I used the ice water!

the verdict:

We couldn't believe how pretty this loaf was! My husband loved the taste of this bread, which he ate toasted, for breakfast. "This is so good I don't want to swallow it. It really is the best ever."

My daughter quipped, "the bread that the baker rejected has become the corner loaf" (a riff on Psalm 118) . Although she didn't intend this, her words, and indeed the afternoon's experience, spoke to me of paradox, improbability, redemption, and even resurrection. A fitting lesson, and... a great title for a blog! And the loaf? I'm commemorating it up on the blog banner!

I'm sending this loaf over to Susan at Yeastspotting, a weekly roundup of fabulous breads.

Sunday, May 3, 2009

A New Blog is Rising

Thanks the baking group Tuesdays With Dorie, I baked my first yeast bread in November, 2008, and was thrilled with how my Kugelhopf turned out. When the holidays were over, I turned to yeast baking in earnest. My "Adventures in Yeast" quickly multiplied, and my poor old blog, The Dogs Eat the Crumbs, quickly became swamped with posts for bread as well as sweets and regular food. My drafts list multiplied to the extent that I was months behind in all of my posts. I (almost) hesitated to try new bread recipes because I didn't have a prayer of posting them. So "divide and conquer" it is!

I set up this blog about a month ago, and have continued to debate whether and when to actually make it public. At church this morning, both the first and second scripture readings contained the language from Psalm 118 "The stone that the builder rejected has become the corner stone." Since that Psalm relates to the blog's title, I decided this was the right day to launch Corner Loaf blog! The next post will feature the bread that inspired this blog's title and provided the image for the blog's banner.

Food blogging helps me keep track of what food I prepare and when, as well as what changes I made and how it turned out. My hope is that the notes will help others, too, as they explore the same or similar recipes. It seems natural for me to have a separate blog for the bread posts. If I can figure out how, I will copy my previous "Adventures in Yeast" over to this blog also. That way all the bread will be in one place. In the meanwhile, you can find those loaves by clicking the "yeast" category at The Dogs Eat the Crumbs.

I'll be posting new experiments as well as posts from my large number of drafts. I don't plan to post in chronological order so my yeast "#"s in the posts' titles will be out of sequence, but if it doesn't matter to me, I'm sure it won't bother you!