Wednesday, November 30, 2011

River Cottage Basic Bread


I was lucky enough to find The River Cottage Bread Handbook by Daniel Stevens at the library recently. I've been intrigued by the series of cookbooks put out by River Cottage, an English food-based entity founded by Hugh Fearnley-Whittingstall. In its words, River Cottage stands for "less dependence on the outside world, food integrity, and the consumption of local, seasonal produce." River Cottage runs a variety of programs and coordinates its activities with several different charities.

My daughter ALE has used the River Cottage Preserves Handbook with notable success, and I was eager to dive into the bread volume. The first part of the book sets out in great detail the principles behind bread and how the ingredients interact with each other. I decided to start baking with the first recipe, the Basic Bread, which is more of a formula. The basic recipe gives a lot of leeway to choose the type of flour, the liquids, the (optional) fat and sweetener, as long as the same baker's percentages are maintained.

n.o.e.'s notes:

- To see a very basic form of the recipe, click here.

- I made a half recipe, yielding one large loaf of slicing bread. The recipe, as I made it, is at the end of this post.

- For this first loaf, I stuck with my favorite combination of bread ingredients: part whole wheat flour, milk, honey, and olive oil. This made it somewhat similar to Dan Lepard's Milk Loaf, except that the River Cottage formula is less hydrated: 300g of liquid per 500g of flour, to Lepard's 350g liquid to 500g of flour.

- I used freshly ground hard red wheat for 30% of the flour, and the remaining 70% was all-purpose flour.

- The liquid I added was milk, and I included optional fat (olive oil) and sweetener (honey).

- I began kneading in food processor, but the processor I was using proved to be too small for the job. So I finished kneading the dough via Dan Lepard's method: brief kneading alternated with 10 to 15 minute rests. The dough was pretty stiff, so I ended up adding a bit more milk.

- In the recipe, Stevens says that you can deflate and then let the dough rise up to four times, and it will improve the bread's flavor. I gave my dough lots of resting periods, in between the kneading.

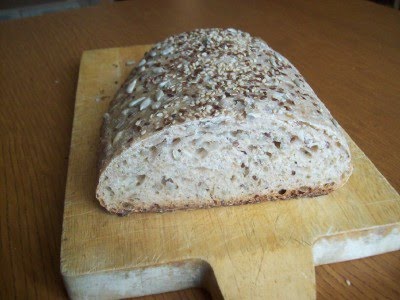
- After shaping the loaf, I coated in whole wheat flour before putting it in the bread pan. This was a new technique for me. Here's the way Stevens explains this step:
You can leave your loaves naked, but they will be much more grateful - and feel much more beautiful - f you give the a lovely coat to wear. Select a flour, or choose grains and seeds.
- The loaf rose beautifully as it baked.

- I started baking the bread in a very hot oven then I turned it down to around 350 degrees because it was so browned.

the verdict:

This was a fun bread to make, especially coating the outside of the bread with flour. I like the resulting crusty crust on the sandwich loaf. The loaf's crumb was sturdy and soft at the same time. This bread made lovely toast.

the recipe:

Whole Wheat Loaf with Milk and Honey

adapted from The River Cottage Bread Handbook by Daniel Stevens

350 g all-purpose flour and 150 g whole wheat flour (4 cups total flour)
5 g instant yeast (1/2 T)
5 g fine salt (2 tsp)
300 g(ml) milk (1 1/4 c) (warm)
a good slug of olive oil (or could use 2 tsp butter)
1 handful of whole wheat flour, for coating
- Mix the ingredients in a large bowl, then knead the dough by hand on an oiled counter until satiny (about 10 minutes). Alternatively, mix the ingredients in a large food processor, dry ingredients first then add the wet ingredients steadily while the motor is running. Pulse for about a minute, then test the dough to see it forms a windowpane when stretched between your fingers.
- Form the bread into a round and put in an oiled bowl to rise until doubled, approximately an hour, depending on the temperature of your kitchen.
- Knead the bread to degas it then form into loaves as desired and coat the bread in whole wheat flour. If you're making sandwich loaf, place the dough in an oiled and floured 1 pound size loaf pan. Allow loaves to rise, covered loosely with a plastic bag, until nearly doubled.
- Bake the bread at 525 degrees (500 convection) for 10 minutes. A steam method is recommended, as well as spritzing the bread first with water before placing it in the hot oven. The recipe also specifies that the loaves be slashed. I slashed but didn't steam my loaves.

- Turn the oven down to 425, 375 or 350 degrees, depending on how brown the crust is getting, for about 30 more minutes, until the loaves sound hollow when tapped, or register about 195 degrees on an instant read thermometer.

I'm submitting this bread to Yeastspotting, a weekly roundup of all things yeasty.

Sunday, October 16, 2011

Fancy & Delicious Cinnamon Raisin Bread


 Free-form loaf made by my daughter

I'm fairly new to baking bread; my kitchen's first yeasted baked good was less than three years ago. Since then I have had lots of fun turning out bread, and have introduced both of my girls to the basics of working with yeast. My daughter ALE took off running, and has become a proficient bread-baker. She fearlessly tackles things which are far out of my league: maintaining a sourdough starter, working with spent brewing grains, and baking in an outdoor hearth oven at temperatures far exceeding the typical home oven.

Since the beginning of the summer, ALE has been baking bread with the Fancy & Delicious bread collective in Buffalo, NY, to sell at market and for a bread share program. (see an article about about Fancy & Delicious here and a lovely video here)

One of the collective's most popular breads is the Fancy & Delicious Cinnamon Raisin Bread. When ALE came home for a visit in August, she baked up a batch of the bread for us (that's her loaf in the picture, above) and left me with the recipe. At the moment, it's become our favorite "daily bread" - the stuff of my husband's morning toast.

I'm posting this bread today in honor of World Bread Day, and also as part of my friend Di's Handmade Loaf Event. Additionally, I'm sending the bread to Yeastspotting, a weekly roundup of all things yeasty.

n.o.e.'s notes:

- The recipe is for 3 moderately-sized freeform loaves, but I used two long loaf pans (1 pound size) and ended up with perfectly-sized loaves for toasting. I oiled and floured the pans, and lined the bottoms of the pans with parchment.

- There are a variety of slightly different versions of is bread recipe. The recipe, as I baked it, is below.

- You can use whatever combination of white and whole wheat flour you like, as long as the total is 6.5 cups. I measured by weight, at 4.5 oz/cup, then adjusted for dough consistency.

- For richer flavor, you can add butter to the cinnamon swirl as you prefer

- At Fancy & Delicious, they mix the dough in a commercial stand mixer. I used a food processor (the dough really filled my large food processor), but you could definitely mix and knead the dough by hand.

- Add the liquid gradually, just enough for good dough consistency, because the dough can get quite slack with too much liquid.


These are my loaves, made in a bread pan. For this batch I mistakenly was short on both raisins + cinnamon swirl.
the verdict:

The minute I tasted this bread I could see why the loaves consistently sell out when Fancy & Delicious sells bread at market. A toasted slice was a perfect cinnamon-raisin experience! It's nutty from the whole grains, and sweet from the raisins and the luxurious swirl of cinnamon sugar. We love this bread so much that I've made it again and again, and now it's my go-to for cinnamon-raisin.

the recipe:

the recipe below is how I made the bread. My friend Kayte baked the bread using the one-loaf recipe variation that the Fancy & Delicious collective uses when it teaches bread workshops. You can see her loaf and get that recipe here.

Fancy & Delicious Cinnamon Raisin Bread
6 1/2 cups of flour: any combo of white/whole wheat flour works fine. (I used about 2 1/2 cups of whole wheat, and included some rye and some oat flour)
1 Tb yeast
1 tb cinnamon
2 tsp salt
1 cup milk
1/4 cup honey
splash oil - I used mild olive oil
1 3/4 cups warm water, or less, adjusting for dough consistency (can be room temperature if you use a food processor for kneading)
1.5 cups raisins
3/4 cup cinnamon-sugar blend per loaf (1 part cinnamon, 5 parts sugar)

1. Mix the flour, yeast, cinnamon, and salt, to combine

2. Gradually add the milk, honey, oil, and water, adjusting quantity of liquid to the consistency of the dough.

3. Knead until the dough passes the windowpane test. In a food processor this will take about a minute.

4. Knead in the raisins. If you have been using a food processor, add the raisins by hand.

5. Turn the dough into an oiled bowl, cover, and let the dough rise at room temperature until doubled in volume.

6. Divide the dough and form into desired number of loaves, shaping as follows:

To shape dough:


a. Prepare 8.5x4.5 bread pan: butter pan and cut parchment to fit pan (so cinnamon sugar will not cause bread to stick to pan), butter/flour parchment.
b. Shape dough into rough ball and grab a rolling pin.
c. Roll dough into a rectangle 1/2" thick.

d. Spread the 1/4 cup cinnamon sugar over middle of the bread, leaving an inch around all the edges.

e. Start rolling by turning a short edge inward.
f. Roll tightly until a cylinder is formed.
g. Press down edges, turn seams under, roll on work surface until sealed.


If using loaf pans, place into pans seam side down. Let loaves rise at room temperature until doubled.

7. Bake in 400 degree oven for 40-45 minutes, until loaves sound hollow when tapped on the bottom and the internal temperature is 195 degrees on an instant read thermometer.

Thursday, July 28, 2011

Bread Links

I've come across some fun and interesting bread-related links this month, and thought I'd share them with you!

1.
Here's an article about the Fancy and Delicious Bread Cooperative in Buffalo NY. My daughter is the one pictured at the top of the article, wearing an apron made by her great grandmother, who, incidentally, baked delicious Parker House rolls. If you live in the Buffalo area, stop by the farmer's market to buy some bread, or sign up for a 12 week bread share (starting this week!). To keep up with the co-op activities, check out the Fancy & Delicious blog.

2.
A very cool event is happening in Maine this week: the 5th Annual Kneading Conference, on Thursday, July 28th and Friday, July 29th in Skowhegan, Maine. The Kneading Conference "brings together novice and professional bakers, grain farmers and millers, researchers, wood-fired oven enthusiasts and anyone who loves to eat handcrafted breads for two-days of participatory workshops, presentations, and panel discussions." The conference is followed immediately by The Maine Artisan Bread Fair on Saturday, July 30th. If the dates and locations don't fit, there will be a related Kneading conference West on September 15-17 in Mount Vernon, Washington. Details on all these events can be found here.

3.
Learn how Hot Bread Kitchen in Harlem is helping immigrant women pursue meaningful work as bakers.

4.
In case your interest in yeasty products runs to the academic and/or historic, here's a post about bread in the middle ages. Fascinating info!

I hope to post some more bread soon, but in the meantime, happy reading!

Sunday, July 17, 2011

BBA Slow & Steady: Mulitgrain Bread Extraordinaire Roundup

Although I am dreadfully behind on posting our results, the bakers of the Slow and Steady subgroup of the BBA Challenge are still working their way through the book. Several of them have pressed on into the sourdough section and are currently nearing the end of the book The Bread Baker's Apprentice!

Their progress has inspired me to pick back up and post the next in the series of Slow and Steady roundups. We all baked the Multigrain Bread Extraordinaire sometime back in 2010, but better late than never, right? Here is how the bread, which is famous for turning out extraordinary toast, turned out in our kitchens:

^^^^^^^^^^^^^^^^^^^^^^^^^^^^^^^^^^^^^^^^^^^^^^^^^^^^


Leslie of Lethally Delicious baked this recipe as rolls, and found the flavor to be "rich and deep." Read Leslie's post: BBA - Multigrain Bread Extraordinare


^^^^^^^^^^^^^^^^^^^^^^^^^^^^^^^^^^^^^^^^^^^^^^^^^^^^^^^


The fourth time's a charm, and after a few failed attempts at making the soaker for this bread, Jessica of The Singleton in the Kitchen, with brown rice on hand, found the bread easy enough to make. As for the taste: she didn't find it to be "bread nirvana" but she reports that the toast was a pleasant way to begin her day. Her post: BBA S&S: Loafin' Around

^^^^^^^^^^^^^^^^^^^^^^^^^^^^^^^^^^^^^^^^^^^^^^^^^^^


Natalia of Gatti, Fili e Farina
loved this bread so much that she got hungry for some when she was writing her post.
her post: BBA Slow and Steady: Multigrain Extraordinaire

^^^^^^^^^^^^^^^^^^^^^^^^^^^^^^^^^^^^^^^^^^^^^^^


Kayte of Grandma's Kitchen Table thought that her bread wasn't much in the looks department (I beg to differ!) but loved the taste. Her family enjoyed this bread as toast, grilled cheese and sandwiches. Her post: BBA: Mulitgrain Bread Extraordinaire

^^^^^^^^^^^^^^^^^^^^^^^^^^^^^^^^^^^^^^^^^^^^^^^


I baked this bread and posted it before the Bread Baker's Apprentice Challenge. In fact, this bread is what convinced me to purchase Reinhart's book (I baked the bread from versions of the recipe I found online) See my post here. The bread makes such great toast that it's worth keeping little bits of cooked brown rice and other grains in the freezer so that the bread can be baked on short notice.